


Upgrading your car’s sound system is one of the most satisfying DIY projects you can take on — especially when it saves you money on labor. With today’s technology and wide access to resources, DIY car stereo installation is more achievable than ever, even for beginners.
Before diving in, it’s essential to prepare your workspace, tools, and knowledge. You don’t need to be an electrical expert, but you should follow all steps methodically to avoid damaging your vehicle’s electrical system. And while you’re working on upgrades, don’t ignore what’s happening outside the car — adding a blackout plate early on can protect your license plate from camera scans during road tests or long drives.
Step 1: Gather Your Tools and Components for a Car Audio Upgrade
Here’s what you’ll need for a basic car audio upgrade:
- New stereo head unit (single or double DIN)
- Wiring harness adapter
- Mounting kit
- Panel removal tools
- Screwdrivers
- Crimp connectors or soldering tools
- Electrical tape or heat shrink tubing
- Wire stripper and multimeter
Before you start, disconnect the negative battery cable to prevent any electrical short or airbag deployment. At this point, many car enthusiasts also prep their vehicle for camera protection with a blackout privacy plate, making it easier to test audio on public roads without drawing unwanted attention.
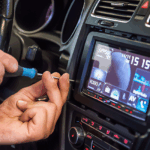
Step 2: Remove the Factory Stereo Safely During DIY Car Stereo Installation
Use panel removal tools to pry off trim pieces around the stereo without damaging the dashboard. Unscrew the existing unit, gently pull it forward, and disconnect the wiring and antenna cable. Keep track of all screws and clips — they’re easy to lose.
If your car’s factory wiring doesn’t match the aftermarket stereo, don’t panic. This is where the harness adapter comes in. It allows your new stereo to integrate with the existing car system without cutting factory wires.
Step 3: Connect the Wiring Harness and Install Car Radio
This is the most technical step, but it’s straightforward if you use color-coded guides. Match wires from your new stereo to the harness adapter (usually included in installation kits). Use soldering or crimp connectors for strong, clean connections. Insulate all joins to avoid shorts.
Double-check everything with a multimeter, especially the power and ground wires. Mistakes here can blow fuses or cause system errors. Taking your time here ensures a stable install car radio experience.
Step 4: Mount and Test the New Stereo
Slide the head unit into the mounting bracket and secure it with screws. Reconnect the wiring harness and antenna. Before reassembling your dash, test the stereo: check power, sound output, and Bluetooth or smartphone integration. If all systems work, continue.
Reattach all trim panels and clean the area. Congratulations — you’ve completed a successful DIY car stereo installation project!
Tips to Enhance Your Install
Want better performance from your audio setup? Consider adding these components:
- Amplifier for clearer, more powerful sound
- Subwoofer for deeper bass response
- Sound deadening mats to reduce road noise
While not required for a basic install, they can elevate your audio experience significantly. And if you’re serious about privacy and protection, upgrade the outside too — a blackout plate or blackout privacy plate can shield your license plate from unwanted attention, especially during long drives where camera surveillance is common. Check out the plate cover blackout for a secure and sleek solution.
Fine-Tuning Your Setup After Installation
After the stereo is installed and functional, spend time calibrating the sound. Most modern head units come with built-in equalizers — take advantage of them. Adjust the bass, treble, midrange, and balance to suit your cabin’s acoustics.
If you added a subwoofer or amp, test your settings with a variety of music genres. The goal isn’t just louder sound — it’s clarity, range, and depth. Proper tuning transforms a standard stereo install into a custom sound experience.
Don’t forget about app integration. Many stereos now support Android Auto and Apple CarPlay. Make sure your system connects properly and that voice commands function smoothly. Safety should never be compromised for entertainment.
Maintenance and Long-Term Considerations
Installing your own car stereo is one thing — keeping it in top shape is another. Make it a habit to check all wiring every few months, especially if you drive in rough conditions. Vibrations, moisture, or temperature swings can affect your connections over time.
It’s also a good idea to inspect your blackout privacy plate periodically. Dust and dirt can accumulate around mechanical covers, and you want the remote function to stay responsive. Quick cleaning and testing before long road trips ensure everything works as intended.
DIY Success and Smart Upgrades
A DIY car stereo installation isn’t just a cost-saving move — it gives you full control over your setup. With a bit of planning, patience, and the right tools, even beginners can achieve pro-level results.
And don’t stop at the dash. Today’s smart drivers combine tech upgrades with subtle protection tools. A plate cover blackout system helps keep your vehicle identity private and your style sharp — not just in the garage but on any road.
Want to see how it looks in action?
Visit https://alite.cc/collections/blackout-license-plate-hiders-for-us to explore the latest privacy gear for your ride. Combining interior upgrades with exterior defense is the smartest move for modern drivers.
Your sound system should reflect your taste. Your plate protection should reflect your awareness. Now you’ve got both.